Showing posts with label My sewing room. Show all posts

Friday, 6 June 2014

Fitting my fitting-aid

May was just as busy as I thought it would be... We had two major events (a white tie event at the university and the high school prom) as well as the start of the wedding season these past few weeks, so the entire staff has been working superhard. I've worked 12-16 hours a day, 7 days a week, and my boyfriend has come to the shop after his regular work to help me out. It has been loads of fun, I've met so many wonderful people and it's been deeply satisfying to see both the gentlemen and the ladies in their attires after we've fitted the garments! While I've enjoyed it, and look forward to next year's crazy May, I'm also a wee bit grateful we're moving into normal summer - meaning loads to do, but hopefully I'll be free from work one day each week, and I'll just need to work late evening once or twice a week.

All right, eunough about work! I started drafting this post in January/February, but never came around to publish it. So here's a little story of how I fitted my new dress-dummy!

A few years ago I got a dress dummy my grandmother had found discarded. It's been a huge help over the years regarding hemming and for storing delicate projects over night. But I never got around to making it a proper body double, as the back at it's smallest was still too wide and too long. This of course also made it a bit inaccurate when I measured hemlines.

Apparently I'm a very, very lucky girl, for my mother decided she didn't need her old dressdummy and gave it to me! It's a size or two smaller than the red one, meaning the back can be made to fit. Here's how I went about to shape it!


First I set it to a measurment close to my own (a bit smaller), making sure that none of the other measurments got distorted along the way.


One important part was getting a correct distance between the bust apex'es (tricky to pad out later).


Second, I draped a close fitting sheath for the dummy, so I'd have something to sew the filling to. Also kept the lines of filling smooth over the "gapes".

Third, I made a skin tight sheath for myself, using my block patterns and reducing the wearing ease from them. Some say it's better to have the dummy with the ease included, but I think that depends on what I want to make. For jersey and bias cut I think it's easier to see how it will really fit on my measurments, not my measurments plus ease. And wovens are easier to get on and off the dummy when it's in my size =)

After finalizing the sheath in toile fabric, I cut it out in a home decor brocade that's unlikely to stretch over time and that can also withstand pins.


Pretty tight, huh? Let me tell you, there was no way to sit down in this thing =)

Fourth, stuffing the dummy! Gee, it was a lot to stuff! One gets a whole other take on body proportions when skulpting them out on a dress form... For the bust I used an old bra, carefully measuring as I went along to make sure the bust measurment equaled mine.


I had really planned to sew all the filling to the bottom canvas sheath, but I was so tired of this project and just wanted to SEW something that I left it, promising myself that I will fix it. Later. Hmm, perhaps I need to set a date for that? Before fall? Yes, that sounds like a plan =) I also need to add more padding, it's a bit too small right now. As you can see below, the sheath is much looser on the dummy than it is in the pics of me above.


The outer sheath closes with a zipper down the back, making it easy to go in and adjust the filling if it starts to slide around. Also, both sheath and filling is fairly easy to adjust should I gain or lose a couple of pounds.


There we go! A dress dummy that can actually function as a fitting aid, help me measure hems (I took the hem-guide from the red dummy, this one's has been lost over time) and that doesn't look too bad on it's own.

Love, Erika

Tuesday, 4 March 2014

Shopping to sew

It's been all finished garments and personal stuff here for a while. But now as the light is returning and with it my energy, it's about time to geek out on sewing! See, I've been on a bit of a shopping spree for sewing related goods...


For the sewing room I got two new cutting mats! My old one was small and started to get seriously worn out. I bought it cheap, just to test if this was a method of cutting out that would appeal to me. And for cutting out jersey and fine fabrics, I totally adore it! So now it was time to upgrade =)

 They're identical, with one light grey side and one black, both with cm gridnet.

The mats are 60x90 cm (A1 size), so when I lay them next to each other I can cut out a blouse or a top without having to move the fabric or the cutting mat. Hurray!


Next item is sort of also for the sewing room; a new bolt of toile fabric.

The bolt I got two years ago is almost used up, and as we were anyway driving by Ikea... Now - hopefully - I'm good for another two years.

Toile fabric is handy, but this is Fun:


Organic Bamboo jersey for two tops. This fabric is soooo soft, I can't wait to wear these tops!


For grand finale; interlocked wool. What, it doesn't look like much? =) Nope, but it's wonderful to touch, it drapes beautifully and I've been thinking about this fabric for TWO YEARS. It's the most I've ever paid per meter, so although I knew straight away that I wanted the fabric, I really wanted to be totally sure of what I'd make and how much I'd need.

Here you can see the structure of the fabric, but the colour in the previous picture os more true to reality.

Luck favored me, and it was obviously about time I got around to buying it, as I managed to get the last 2,5 meters. Perfect!

Ok, I'm off to the sewing table. I've got new toys to play with =)
Love, Erika

Thursday, 7 February 2013

A studio sewing table


Let me tell you a sad, sad story of the one worst moving-purges I've ever done (I promise, there's a happy end!). When I lived with my mom I had a pretty 60s teak writing desk. It was a perfect size, 80x120 cm, easily de-constructed for storage or transport and with two small drawers at one side, making it perfect to sew at since you could easily have two machines next to each other. However, this was before I fell in love with vintage, when 60s teak was just quaint, and before I started sewing on such an everyday basis or owned two sewing machines. But I did love the desk, and something about it spoke to me (maybe a premonition of the love affair to come! ;) ). I was moving up north (leaving home for the third and final time), having rented a partly furnished one bedroom appartement, with no additional storage space, second hand. At the same time mom and my sister Kajsa was moving to Malmö, and my brother Joakim was leaving the nest. The house was sold and everybody would have less space in their new homes - lot's of hard choices were made.
I loved that desk, I really did. But the appartement already had a desk, I anyway had a load of moving boxes I couldn't store anywhere except my bedroom and the hallway. Mom stood by the car, the desk halfway out and I hesitated, so very torn. Mom said "Will you take it with you or no? I'm going to the landfill now." I closed my eyes, pushed away the knot in my belly and said "Go."

Wrong decision. Totally wrong. And one I've regretted more times than I can count. For in the end I could have found space for it even in the furnished appartement - four legs and a slice of wood is easy to fit in and I anyway felt like I lived in a storage space that first year. When I moved to my own place it would have been perfect. Not so long after that the love-affair with vintage started, I began appreciating the old teak furnitures more and I started sewing more regularly. For five years I've searched for the twin of the desk I foolishly let go (don't think about the landfill, don't think about it smashed to pieces. D**n, too late.)

I try to tell myself that I've learned something very important through this: Sometimes it's hard to let go of old things because of misguided nostalgia, and then it's a sort of catharsis to clean them out. Hard to do, but you feel better afterwards. Other times, it's hard to let go because you deeply love something, even though it's not practical or doesn't fit in. And then it's foolish to ignore your resistance, it's better to keep what we deeply love close to us, and adjust the little things in life to them, instead if the other way around. The trick is to learn to tell the difference between nostalgia and true affection.

So, all of this said, I've been on the look out for a new sewing table for years. I've activly searched for two years, since moving to my non-student appartement and therefore having more stability in my living situation. And I've finally found it! And it's even better than the one that got away! May I introduce you to...


Ta-da!
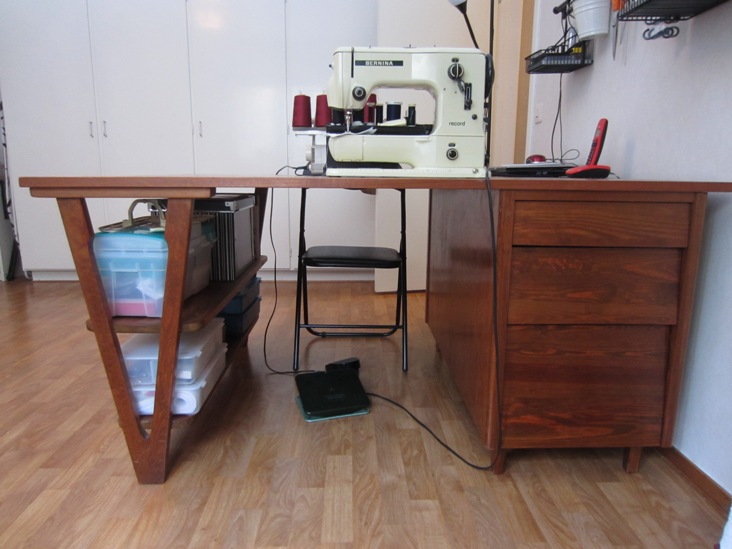
It's an old studio sewing table that belonged to the seller's passed away mother (a lady who apparently ran her own sewing studio). I'm pretty sure it's made to order, as there are so many unique features to it (and some signs of traditional woodman craft).


It's 110x150 cm (xxx"), so it's huge! At least in my book it's huge =) The surface is covered with something that has a suspicious similarity to plastic carpeting, but whatever it is, it's very unsensitive to needles, scissors etc, and the fabric doesn't shift around a whole lot on it. I like it =)


There are two sets of drawers, the bottom one on the right side is tailormade for hanging folders.


On the other shortside there's a beautiful shelf, perfect for storing boxes of sewing supplies and sewing reference books.


It was in pretty bad shape, but after some cleaning and a lot of teak oil it looks great. It was also a bit unstable, but some wooden plugs to secure the table top to the drawer unit and it's standing still =)


It is a bit big for my sewing area, but I don't care - I love it! Looking forward to spending lot's of hours at it for the next 40 years or so =) And I've learned my lesson: even if there comes a time in my life when I don't have room for it, I'll find a way to store it until I have space again. This time, I'm holding on!


I'm off to sewing, there's a lovely table calling to me for attention... =) Have a great weekend!

Love, Erika

Friday, 29 June 2012

Pattern storage - problems and solutions

Pattern box

Like many sewists I've hoarded a small collection of patterns. They're stored in a box, and I love taking them out and admire the pretty covers. Commercial patterns, both vintage and new, are easy to deal with once the project is done, but how about the other patterns?

Guilt box

Since I either trace and alter patterns, or (most often) just draft them myself, I end up with a lot of patterns that has no obvious storage place. Usually it goes like this:
- Draw an image of what I'm aiming for
- Trace (printed pattern/basic sloper/similar pattern)
- Draft alterations
- Make a toille and fit
- Mark up the changes and clean up the pattern, draw a second generation of some pattern pieces if needed.
- Sew
- Not throw away toille, "not-final-generation-pattern-pieces", and left over scraps of toille fabric and pattern paper. Why? Because obviously all of this might come in handy in the future!

And it never does. The final pattern I often use for future makes, or as base for a new pattern, but the rest is a waste of space and I'm slowly learning to throw it away. Not an easy lesson at all...


However, I've worked out a new system, and it seems to be working! All needed is a binder and some plastic folders. When the project is done, I take the inspirational image I drew before getting started, maybe make a list of the pattern pieces on the back, put it in a plastic folder with all the pattern pieces and maybe a fabric sample, and voila!

Some of the folders in the binder.

Next time I want to make a pattern I'll just browse the binder! I have a feeling this binder will grow into more binders in the future, perhaps one each for dresses, skirts/trousers, blouses, outerwear and jersey. I'm really forward to creating more patterns!

Pile of inspirational drawings... If I manage to make all of these ideas I will certainly need more binders... Yay!

I have a strong feeling this will make my life considerably easier when it comes to finding my patterns. Also, browsing through a binder full of colored images of garments I've made is just as fun - or maybe even more fun! - as browsing my commercial patterns. There's a sense of accomplishment, and "oh yes, I've made that!" =)

Of course, there's room for improvement. The pattern paper I prefer when drafting is easy to mark, erase and tape, but bulky to store. The plan is to transfer the TNT patterns to my finer tracing paper that is a lot thinner, doesn't crease or break so easily and is great to store. So ideally, when the garment is done I'd trace the pattern to the finer paper. Yeah, right. I'm working on at least tracing it to the final version next time I use it, I think it's a more realistic aspiration.

One step at the time... Right now, I'm hoping to soon place this drawing in the binder:


How do you store your sewing patterns? Do you draft, trace or are you perhaps lucky enough to get away with only using commercial patterns out of the envelope?

Love, Erika

Sunday, 29 April 2012

My sewing space


I've organized my sewing area! For me, the purpose of the Ikea-trip earlier this year was to get the last things needed to put the final touches on my sewing area. Some small things to organize it and make it user-friendly. Since then I've been torn whenever I've had a day over: organize or sew? Last weekend I finally set the sewing aside, and re-organized my stuff.


I started with taking out all my fabrics, and only keep the ones I have a planned project for (and a small pile with fabrics that I have a few different ideas for, but haven't decided on which idea I prefer). The rest, about 1/3, went to the storage room in the basement. Some of it I know I want to keep, but have no immediate use of (like 12 m of white linen. For example), other stuff I'm more uncertain of. Ah well, later problem =) The fabric above is what I kept in the appartement...


The fabric all neatly(?) stashed in my vintage linen cupboard, aka the fabric closet. See, there's even room for more! Yay! Does mean I can go fabric shopping? ;) Before, I've sorted fabric by content, now I tried something different: sorting by type of garment it will become. The jersey's got their own pile, though.
I know a lot of people store their fabric on open shelfs, which is very pretty and inspiring. However, I've had some of these pieces for more years than I care to admit, and keeping it safe from sunlight and dust is a priority. Hence, doors are a must.


Overview of the fabric closet, the sewing bookcase, my hatboxes, and how I store my pressing table. Easy to reach but away from sight, just how I need it to be to have the energy to put it away between sewing sessions!


I cleaned out the bookcase rather good to, all my sewing books actually fits into it now! And my boxes for supplies/thread/special scissors etc (notions and haberdashy). My patterns also lives here, in the white+grey boxes.


I had some problems of what to do with all the toille fabric (I bought 25 meter at Ikea...). I made the underbed storage box a pure toille-supplies box with fabric, tracingpaper etc. The other box is for all the non-sewing related craft supplies, like yarn for knitting, knitting needles, lace-patterns, crocheting supplies and so on.


Where the sewing actually happens: the desk. Made a lot easier to use with all the small thing out of way and up on the wall. The wall hanger is actually an Ikea kitchen tool, very handy. The computer's on the small hutch, and when I spend more time in front of it (like now, writing a blog post) it takes 5 sec to lift it up on the desk. I find having it like this means I don't get stuck in front of the computer so much.
The thing on the right of the desk is a closet that one can spin around, on the other side there´s a full length mirror. Very practical when fitting! It holds the project boxes I got at Ikea, plus pressing supplies and my UFO-pile (which is safely hidden out of sight). It's so easy to have it all in a box, pattern, fabrics, toille, and then a lid on it so it doesn't get dusty.


Over the desk: a print of 19th century outfits. I did realise when mounting the handle on the wall that I had bought too few hooks. Don't worry, it will be remedied this summer!

So there you are, a full tour of my sewing area! I don't have a cutting table, but one of the best things with this huge bedroom is that I can place 4 metres of fabric, 150 cm wide, flat on the floor and there's still room to walk around it. Without moving any furniture or so =)
Hope you enjoyed the look! How do you sew, do you have a separate sewing room (oh, in my dreams...)? Or a designated area? Do you store lot's of fabric "that can be useful in the future" or do you only buy for one project at a time?

Love, Erika

Wednesday, 11 May 2011

New toys and an old dress

I've danced again! After a 4 month long break from all dancing I'm finally swingin' it on the lindy-floor again! I'm carefull not to dance a full night (3-4 hours) but to warm up, stretch, dance one hour, stretch and then rest. The resting is the hard part, but it helps that the program actually seems to be working. Yay! Herräng, here I come... Only 2 months away now.


This is a dress some of you have seen before, and some of you will even wonder if I ever wear any other dresses while dancing. And I do! I just haven't remembered to take photos, and it's been ages since my last outfit-post. So here it is, an oldie but a goodie!


My hair in flat victory rolls. The hairdo is one I haven't done for at least a year. I couldn't remember why until I tried to make it look smooth... Ah, well. It was for dancing, it got messy anyway. This is the after-dance picture, I'll just blame it on that =)


I of course had to test how it worked with my hat collection! I liked this combination for a summer outfit. Maybe with the dress I'm making? Good or too much when matched with a pink flower-print? (The fabric in question is in the last post before this one).


On a whole different topic: remember I talked a while ago about my passion for sewing toys tools? I had to order some things (honestly!) and the shipping was the same no matter weight or size so I ordered some extra stuff...


Belting material, zippers, shoulderpads, chalk wheel, bias-tape maker, belt-turner, magnetic pin cushions and... a rotary cutter with a cutting mat. The last ones are apparently great for knits and silk, which means: fabric shopping! Wheee!

It's finally spring for real, I've had a great weekend and now I'm happily playing with my new tools =) This week I hope to finish the dress I cut out last week, only have hemming and inserting sleeves left to do. It's amazing how fast sewing is when one isn't tailoring a coat =)

Love, Erika

Sunday, 20 February 2011

Tools or toys?

Everytime I take up a new hobby I'm struck by the same feeling: the interest in all the little things one can buy. It's tools, little garment details, practical things, purly decorative things, bur I want them all, convinced that if I just have all the proper gear my experience will be perfect. Which is silly, because in the end it's not the gear that makes the hobby but the actual performance of it.

However, while toys are fun there are so many things that are practical. Danceshoes are shoes, which means they´re fun to buy, but they're also much needed if one dances a lot (for knees, feet, legs, posture etc). Sewingmachines are fun, but certainly also makes the sewist's life easier. So how to think when the things I crave as toys also are practical tools? Nowadays I think 1) Will I use it enough to merit the expense? and 2) Do I have room to store it? I'm often saved from "pratical purchases" by having to say "No" to the second question, my appartement is small with limited storage spaces.

Sewing is by no means a new hobby to me, but the intensity of it has shifted the past 1,5 years. A bit because of my vintage interest (sewing period clothes that can't be bought) and a bit because of my injuries giving me more time for quiet hobbies. I've sewn quite a great deal in my days, but little modern, meaning I have very few of the tools often taken for granted by sewists (in medieval circles I'm considered a great cheat as it is; I use a sewing machine after all! =) ). There's a lot of "Oh, I want that" and "Oh, I need that!" and "OMG, I've been looking for a place to buy that!" when I browse any sewing tool section =) I really try to remember that if I've made it this far without something, I probably don't really need it. Some stuff I've given myself leave to purchase/aquire:


A point presser (kantpress) and a tailor's ham. The tailor's ham I made myself from leftover fabric, it has wool from my thick coatfabric on one side and a double layer of cotton on the other side. First I stuffed it with rags, as one DIY said to, but it ended up very lumpy and uneven so I changed the filling to sawdust. At first I was at a total loss, where do one buy sawdust?, until pet-stores were mentioned. Cages for small animals has sawdust on the floor! *mentally clapping my forhead* The supermarket has a pet-isle, and what do you know? Sawdust!


An aid for measuring and a new seamripper, with a better handle. Both were in use within a few days of arrival.


I've been coveting a dress dummy but found them too expensive (a bit like the overlock, which btw works like a dream after service). I might very well be the luckiest girl in the world, 'cause my grandmother found one. And I mean found it, someone had thrown it in the trash (in a big plastic bag, in the trashes where one throws clothes, furniture etc, not the icky trashes). She rescued it, but it's the wrong size for her and she anyway has one, so she gave it to me! Thousend thank you's, grandma!


All the pieces are there, it's only fault is that it has separated in the waist. Some spring or something is missing, so one can press it together but it doesn't stay that way. Hopefully I'll find a way to lock it in place in a suitable height, but until then it will still be a great help while I'm sewing the coat. Later on I'm planning on making a fitted shell and fill it so the dummy actually have my measurments (nope, it can't be altered to that extent, I have too great variations between back, bust, shoulders, waist and hips. Erhmm... the bodice.).

Other things I covet but don't know if I really need are duckbill-scissorns, zigzag-scissors, loop-turners and chalkwheels. And lot's of other things, but that's what came to mind while writing. What do you say about this? Are these things (both the things I have and the one's I want) tools or toy's? Anything of it that you can't live without or that you've tried and never used again?

Hope everyone has had a great weekend!
Love / Erika

Sunday, 9 January 2011

The Christmas Dress - but for New Years Eve


I finished the Christmas Dress! Made in gloriously red ecological cotton interlocked jersey. I'll rave about the fabric later, let's stick to the dress for now =) Well, to be honest, I didn't get it done in time for Christmas, but in time for New Year's Eve (like minus 30 minutes in time...)

I've seen this style of dress countless times in patterns and Sears catalogs from late 30s and early 40s. Bodice pleated against midriff and shoulders, set in sleeves, A-line skirt with maybe a few pleats. Instead of using a pattern that would need to be altered 100 times, I made my own pattern from a basic pattern I have (a bit like I did for Malin's dress). The only thing I changed was not to sew down the pleats on the skirt down to the hips, as I wanted the freedom to eat lot's of Christmas food.


The little bow brooch I found at a fleamarket past summer, the belt originally came from my grandmother, and the necklace I borrowed from mom so long ago I've started to consider it to be mine =)


For closure I set in an invisible zipper in the left side-seam.
The picture below is a bit dark, it's more like the colour in the first three photos. But here the construction is clearer. I'm mostly happy with it, except the waistline, it's a bit uneven. Good thing I'm wearing a belt with this dress!


Will you let me indulge in a little rave about the fabric? Please? Eco fabric is almost impossible to find in Swedish fabric stores, but there is a mailorder company (Swelogent) which carries a lot of eco-fabrics. The catch? It doesn't sell to private customers! Only to companies, schools and such. It's really annoying, because does the stores order these great fabrics? Of course not. *grumbles* However, the sewing class I took last semester is connected to a school, so they could order from Swelogent, and we students through the school. Yay!

About fabric names; I've never encountered double knitted jersey in Sweden, but there is something called interlocked jersey. It doesn't fray, it's a bit more stable than single jersey, it's quite heavy and it has more body than single knits (so it drapes beautifully, but doesn't show every bump along the way). What do you guys think, is double knitted jersey the same thing as interlocked jersey? Read Gerties post here for more info on double knits.


An inside-out picture. I chosed to interline/underline the top front bodice, giving more stability to the surplus from the pleats. I've planned a more detailed post, with pictures, of how I transformed the pattern. I'll also add some thoughts to sewing with interlocked jersey, in case someone is considering using it for the first time (and I really recommend trying it, it was great to work with, it's comfortable and drapes beautiful).

One thing that became clear was that life as a seamstress is made a lot easier with an overlock (serger, for the trans-atlantic readers =) ). I used mom's for a few seams during a quiet morning the christmas weekend, and I fell in love. Head over heels, unrational and utterly in love. I had to get one, but in my clearer moments I knew this was a futile dream. Even worn down second hand overlocks are way out my budget, and then they need to be sent on service as well. Let's not even discuss the new ones that are good machines...
While talking to mom I scanned Blocket (a swedish online garage-sale) and there it was! The add had been out for only 40 min, a Saturday. A second hand overlock, old but not much used (which is actually a bad thing in sewing machines, the engine needs use) for 300 SEK. That's about 30 euros, or maybe 40 $. In chock I called the seller, yes, it was still there, yes, she only wanted 300 for it (it had been her mom's, she had never used it and now she just wanted to get rid of it to free the storage space), and yes if I wanted her to, she would hold it until I could come. I jumped on the buss, and four hours later I was home, with my very own overlock!


Not the newest model, and in dire need of service after close to ten years without use, but all mine! For 300 SEK! Or 400, counting the buss fare. Now I'm keeping my fingers crossed that it will actually work, as I don't dare to even try it before it's been on service. I'm praying it will only need a good clearning and oiling to work, but I'm also prepared for the worst, that it might not work at all.
If it does work, then this (even including service-fee) will have to go down as my best thrift-find ever. I was so happy yesterday it was a good thing I was alone at home, I was just bubbling! Sitting on that bus my head spun, my stomach danced (in a good way) and I was just lost in the clouds =) Sometimes life does throw you unexpected gifts!

Love, Erika