Showing posts with label Dresses. Show all posts
Sunday, 29 December 2013
The Christmas dress
I hope you're all having a happy holiday! I've been staying at my mother's in Stockholm, celebrating Christmas the swedish way (traditional swedish food and hanging out with the family on Christmas eve). Also, there's been the usual running around Stockholm to meet up with everyone... =)
Last year I bought 2 metres of jersey and 2 metres of lace and figured I'd make it into a Christmas dress for this year. I came close to stumbling on the finish line here... I started drafting the jersey on Friday evening the 20th, sewed the jersey on Saturday morning, drafted and toiled the lace on the afternoon/evening. Sunday I packed for Christmas and sewed the lace-dress.
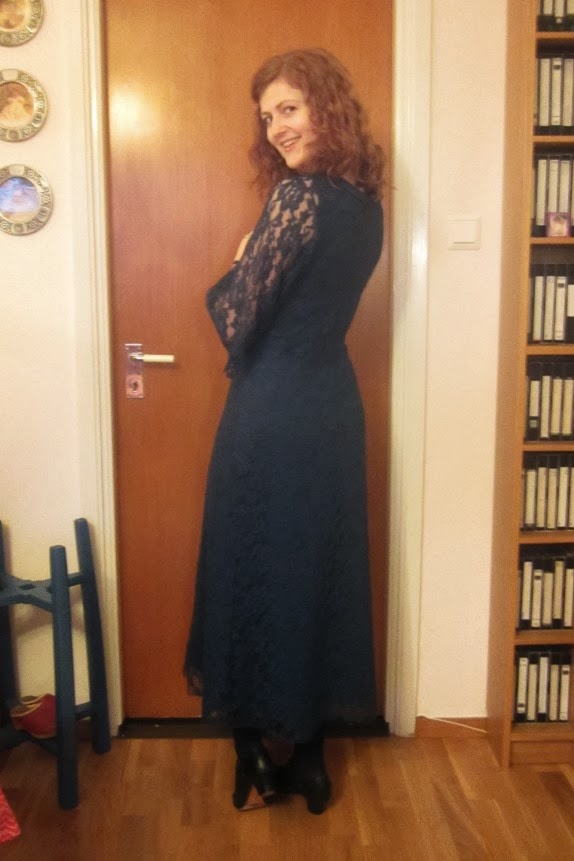
The bottom layer is a plain jersey dress, without sleeves. The top layer is more interesting - it's lace cut on bias. The lace has no stretch on it's own, but it's a loose weave lace, so it has some natural stretch due to that. But as I didn't want to join the two layers, I also didn't want the opening a waistseam would require. This was my solution:
A bias cut diamond shape in the side. I first got this idea from one of the dresses in the Hollywood exhibition at Albert & Victoria museum in London last year. I'm not sure how period accurate it is, but they did use paneling during the early 30s.
The front was also a new to me: I made a high cowl neck, with the bodice pleated to a midriff piece.
The skirt is my by now trusty bias A-line pattern. The back is also cut on the bias.
One of the trickiest part was figuring out the pattern layout, so that the weave strength on both sides of all seams matched each other.
This was a really fun project, and I'm thrilled I managed to get it done in such a short time!
Happy holidays!
Love, Erika
Monday, 9 December 2013
A dress for blues dancing
As per usual my carefully laid sewing plans this fall went straight to… *erhm* They didn’t work out as I had planned. Or at all. That meant my grand vision that included a gorgeous rayon, matching chiffon with embroidery and sequins, and of course a smashing 30s silhouette, that vision had to be put on hold for a later date if I wanted a finished dress to wear to the dance instead of just an idea. So what to do instead?
I wavered between the three drawings to the left above, but even though I decided for the one to the farthest left, it was never a “Yay! I’m going to love this dress!”. At first I tried to ignore it and stick to my chosen path, but as I picked out the jersey I bought in London last year (intended for a bluesdress) and the pattern pieces, a new dress just seemed to grow out of what was in front of me. The result was the dress on the right, minus the split (when test-dancing the dress, I realised I didn't need the split).
Ever had that happen; that a project seems to change itself, and take an ok idea to something totally different? The end result was a lot more suited to the occasion, to the fabric and to what I really really deep deep down wanted. It’s strange what can come out of being true to one’s gut feeling and just follow the intuition. I’m not sure I can say I drafted this dress, it more or less drafted itself.
The entire front bodice got an overlay of lace, pleated to the neckline. The skirt was cut (on-grain) from my bias 30s skirt pattern, so made long + slim. Sleeves also got a cover of lace.
The best is the back! Covered with lace, the jersey beneth dives into a deep V. This is a style I’ve dreamed of wearing, forever! But with my bust, skipping the bra just isn’t an option. However, when I realized the Glamour Corselette I also got in London would be ideal under the thin jersey skirt, my mind raced to the conclusion “Holy Moses, I can make a deep back!”. As a deep back isn’t ideal when dancing - the lead’s hand goes right over there, and as I’ve discovered myself when leading followers wearing tank tops with spaggetti-straps, it really is a much more pleasant experience to have some fabric between hand and back – I kept the full lace back, and just cut out the jersey.
Due to the cut out back, my slips wouldn't work, so I made a lining from knit stretch lining.
Dress inside-out with the back lining visible...
...and the front.
Did I lose something with this change of plans? Yes and no. The original jersey dress would have been an allround Little Back Dress, usuable for many occasions, from dancing to dinner parties. The dress that I ended up making is a pure Blues Dance Dress (ok, I may wear it for New Years Eve as well ; ) ). However, a multi-purpose allround LBD wasn't really what I desired deep down. I wanted a dress that walked the narrow line between classy, but not "funeral". Elegant and simple, but interesting. Sensual, but not sexy nor slutty. A bit like blues dancing =)
Also, from a more practical point of view, this jersey isn't of a very high quality and I fear it wouldn't make it long as a much-in-use allround LBD...
And I did my first attempt on fingerwaves!!! The rest of the hair is brushed through and pinned up in a faux bob.
The dress was fantastic to dance in, and we had a wonderful Blues Dance Night! Above is me and my sister Kajsa during clean-up after the dance. We didn't coordinate or anything, but I love how our outfits matched with black jerseys, textured bodices, matt skirts and long-ish sleeves =)
All for now!
Love, Erika
Thursday, 23 May 2013
Summer SWAP 4, 5 and 6
While pondering 30s fashion, I've been sewing up more jersey-stuff... (the dresses has already been featured, in the MMM on holiday-post).
1) V-necked top. This fabric was a nightmare! It didn't seem to have selvedges, more like cut edges. The printed pattern was parallell to the edges, but the grainline was maybe 20 degrees off. Laying out the pieces took ages, and I still think most pieces are slightly off grain. Pieces of this top will undoubtedly twist during washing. It has very little lengthwise stretch, so the underbustseam is higher than on the floral top from last week.
The whole point however was to test the pattern in a V-neck version. The neckband is not sewed on perfectly, but I do like the style. Not sure this top will survive long in my wardrobe, but it was good to test the V-neck pattern alteration =)
2) I had planned to make a dress in the horrible, off-grain fabric, but after discovering all the problems outlined above, I figured it'd be a waste of time. So I rushed out and got a turqoise viscouse jersey on sale at Ohlssons...
The floral dress was nice, but apart from me messing up the elastic in the waistseam, the entire waistline was too high. Very strange, since the pattern is drafted from my chevron dress that sits great at the waist. Then I got to thinking: the shoulder seams on that one has a tendency to wander backwards. Maybe the surpluce in the front bodice (the one I reduced for this later pattern) was divided between front and back to make the whole bodice longer?
Anyway, I added length a little bit here and there on the dress bodice pattern, altered the sleeves to be loose and half-long, slimmed down the skirt top to reduce the gathered effect, and changed the gathers in bodice and skirt into small pleats, more visible here:
However, this was still just a testrun for...
3) V-necked dress in the lovely jersey I bought at Stockholm sewing expo last fall. This fabric is wonderful! It has drape, a heavy fall, excellent recovery, is not thick and yet it has a bit of body so it doesn't fall all over the place. It cost a dear coin (twice the cost of the turcoise above), but I have a feeling it will last more than twice as long and see a lot of wear.
For me, this is a summer evening dress, or a winter dance dress. It'll be perfect for bluesdancing!
And that concludes the fast and easy part of my summer SWAP =)
Love, Erika
Monday, 22 April 2013
Summer SWAP 1,2 and 3
1) Half circle skirt in blue mixed cotton. At least I think/hope it's part cotton... I bought the fabric ages and ages ago, and half of it became the first sewn garment featured on this blog (a pleated summer skirt). I've had loads of grand ideas for the 1,5 metres left of this fabric, but nothing has ever seemed right. This may not be a fancy fabric, and it has a shady content, but it's grease and dirt-resistant, it hardly wrinkles and the pleated version is one of my most used items. Hence; another half circle skirt! =) This time with an invisible side-zip.
On a side-note: now I understand the whole shebang about using invisible-zipper feet. I'd only tried it on very thin and flimsy fabric, and thought it was a big hoax. But on this sturdier fabric it worked great!
2) Jersey top. Not much to the naked eye, but a big deal to me as I've adressed and - keep your fingers crossed - conquered the fitting issues in my previous makes! The excellent advices I got on my post really summed up to one thing: a modified SBA. What?! I'm an E-cup, for heavens sake. A very new situation to me... However, my starting point was my sloper for wovens. That sloper has undergone serious alterations, amongst others an FBA. Protruding things stretches jersey more than flat surfaces, meaning that what would in woven have been needed extra fabric for my bust, was in jersey surpluce.
Not wanting to alter the length of the sideseam or the shoulderseam, I reduced the overbust, the neckline and the underbust-gathers. I cut up the front bodice along these lines:
And then overlapped the desired amout (meaning: I made a rough estimation by testing the last top and tested by pinching how much it made sense to reduce over the actual bust. So, I guessed). It worked out darn well!
I also reduced the sleeveheads so the sleeve is inserted flat.
3) Time to test the new top-pattern as a dress! This is a real Frankenstein... The skirt and midriff is from the chevron dress (with 1,5 cm added at center front of midriff-piece), the back bodice is from when I altered the chevron-dress pattern for a V-neck dress that didn't get made, the front bodice and the sleeves are from the new TNT. (And I traced all pieces so all patterns are complete! Quite shocking...)
I've skipped the stabilizer in the underbust seam, but kept it for the shoulders. The waist is helped by an elastic inserted in the overlock seam. I messed it up a bit, though, as I sewed in the elastic wrong (forgot to stretch it and put it on the skirt side instead of on the midriff side) so this dress will be best to wear with a belt. The elastic may also get a bit better after washing. Ah, well, this was the test-run dress =)
New solution to finishing the neckline: cut a 4 cm wide strip and treat it like a mix between biastape and waistband. Attatch right side to right side...
...fold over the overlock-seam so it's engulfed by the band and top-stitch with a zig-zag just next to the seam. Setting my machine on a narrow zic-zag, I can use my zipper-foot (or whatever it is, that's what I most often use it for) and get really close. The finished band ends up a bit round, but I like the effect.
All the hems are folded under once and then top-stitched with a narrow zic-zag.
That was my three easy starting projects; fast to make, versitile and easy to wear. Now it's time for a couple of more jersey projects on the summer SWAP!
Love, Erika
Wednesday, 10 April 2013
Green wool dress, 40s style
It's ready! Yay! =) This dress took a while to make, partly due to the time of year when I started the project (from now on I should stick to TNT jerseys during February), and partly due to the shifty nature of the fabric. It's 100% wool, with a beautiful drape and a loose weave that makes it easy to press and easy to hide stitches in, but in my mind I named this make "The maybe I'll just baste it first-dress" =) All details have been basted, and though it may seem timeconsuming, the alternative (pin, sew, unpick, pin, baste, sew) would have taken longer...
The dress is made using a pattern I drafted from my blockpattern. This is my third make of this pattern, and each time I alter something. Close up of the altered details:Shortened neckline to prevent gaping.
Upper front body is underlined in a fitted, thin muslin, hopefully controlling the ease from the pleats to lay still =)
Gathers altered to pleats, at bodice to yoke (front and back), bodice to midriff piece and end of sleeves to cuffs.
Shirtsleeve-placket instead of a bias-bound one. (As usual all the buttonholes are handworked).
Handpicked, lapped side zipper.
Inside of hem
Hem from the right side
Hem reinforced with fusible interfacing, hemline basted, steamed and pressed as shown here. Handstitched.
Regarding what era to pin it to, I'm just not sure... At first I thought of the late 40s, with the pleats and the half-circle skirt, but the sleeves are a bit wrong for that, aren't they? The 70s spring to mind, and it sure does have a lot in common with that decade. The only details landing it in an earlier decade is the length of the skirt and the sidezipper. Maybe late 30s/early 40s? Just at the start of WWII there was a period when skirts were getting wider and more circular again (soon made slimmer due to fabric rationing), and the puffy sleeves of the 30s were still seen. Maybe it would would fit that time period better? Anyway, it's somewhere in the general 40s style =)
Hmm, maybe I can have fun with that... A hairdo, seamed stockings, fancy shoes, and it's obviously a dressy 40s look. Ponytail, cotton/wool thights, winter boots, and it's a more casual 70s look.
So happy to finally have completed and photographed this dress! Sorry about the photo's though, some a bit murky and I'm not sure what's going on with the colour. The colour in the view of the back and in the hemline-pics is the most accurate =)
Love, Erika
Monday, 25 March 2013
Work in progress and some tips for wool
I mentioned a few posts ago that I'm working on a 40s dress in wool, and I thought I'd show you all how it's coming along. A little WIP (work in progress), with a tip for pressing wool at the end.
I've made some changes compared to my last version of this dress. This is my third make (see first here and second here), and I'm still tweaking the pattern! I'm hoping third time's the charm... For a better fit, I shortened the neckline, to prevent gaping, and added a fitted underlining to the top front bodice pieces, to control the spread of the extra fullness from the gathers. Stylewise, I reduced some fullness in the sleeves, and also turned the gathers into pleats (on sleeves and both front and back bodice).
I've also for the first time ever made a shirt sleeve placket!
And here the difference is quite clear.
Dress almooost ready
I've made some changes compared to my last version of this dress. This is my third make (see first here and second here), and I'm still tweaking the pattern! I'm hoping third time's the charm... For a better fit, I shortened the neckline, to prevent gaping, and added a fitted underlining to the top front bodice pieces, to control the spread of the extra fullness from the gathers. Stylewise, I reduced some fullness in the sleeves, and also turned the gathers into pleats (on sleeves and both front and back bodice).
First sleeve-placket!
I've also for the first time ever made a shirt sleeve placket!
I love working with wool, it really is the most amazing material! Eh... yeah, I might have said that before... The yoke and the midriff is top-stitched here, easy for the yoke's straight lines, but the midriff piece has a curved top, which can be tricky in other materials. Here's why wool is awsome...
The piece is cut out, interfaced with fusible lightweight, and the edges are overlocked with a right needle 3-thread seam (zick-zacking works great if you don't have an overlock). Using a measuring guide, I pinned down the seam allowance.
Then basting. Here the seam allowance is 1,5 cm, and the basting line is approx 3 mm from the edge.
Remove pins after basting, and behold the surpluce fabric!
Insert a piece of paper (mine was standard writing block weight, so I folded it double) between fabric and seam allowance.
Place a press cloth over the whole thing, and with the iron on the highest - steam it while pressing down. Do not move the iron around! The presscloth will protect fabric and interfacing from the heat, the steam will shrink the surpluce seam allowance, and the paper will protect the right side from pressmarks. For a presscloth I use a very lightweight 100% cotton. If one wants to go fancy there's always silk organza. As long as the presscloth is see-through and natural fibers, it's good.
Remove iron and presscloth, place a clapper on the fabric if you have one. Continue all the way around =)
And here the difference is quite clear.
Instead of this multi-step pressing procedure, one can of course just trim and snip the seam allowance, letting the snipped pieces overlap each other, but I think this way is less bulky, makes a nicer edge and is more durable as the fabric remains intact. It's also really easy to topstitch on this clean and distinct edge!
This pressing technique - paper, presscloth, hot iron, steam and a clapper - is how I press every seam along the way I sew. With a little less steam and pressure of course, as I don't want them to shrink =) It makes the seams flat, and protects the right side from pressmarks.
Different fabrics of course demands different pressing techniques, this is just the one I've come to prefer on light to meduim weight wool. Heavy wool deamands a bit more, I find. What do you say, is this something you already do? May try? Or do you have another method that you'd like to share? Chime in!
Love, Erika
Monday, 23 May 2011
Thrifted green dress
I went thriftshopping at a charityshop with a friend, and came home with this late 50s/early 60s dress!
I love the pleat detail in the front, such a simple thing that makes the garment so much more interesting.
Sorry sbout the quality of the photo, my windows are all east and it was late afternoon when this was taken. But I wanted to give you a good view of the frontpleats.
Feeling Mad Men-inspired here =)
In all fairness, I didn't find the dress, Kattis did. Here's a confession: I'm actually quite poor at hunting in charity stores. There's always so much uninteresting stuff that unless the good stuff is fully visible, I miss it. There, I've said it. I'm a bad second hand-shopper. But I did find a blouse for Kattis! So practical for two friends not to have the same size when hitting second-hand stores! =)
Hope you've had a great weekend!
Love, Erika
Subscribe to:
Posts (Atom)